Securely Building and Deploying Content with GitHub Actions, Amazon S3, and Amazon CloudFront
Posted February 28, 2025 by Trevor Roberts Jr ‐ 8 min read
I recently used GitHub Actions to build and deploy content for my Justice Through Code workshop. It was interesting to compare the experience with my blog's existing CI/CD pipeline with CodePipeline. Read on to learn how it went...

An Opportunity To Mentor Great Technologists
Thanks, Tyler Lynch, for your LinkedIn post that informed me about Justice Through Code (JTC):
JTC is an inspiring program whose goal is to educate and nurture talent with conviction histories to create a more just and diverse workforce. Due to my family being justice-impacted, I jumped at the opportunity to serve as a guest lecturer on the topics of cloud and automation.
Hosting the Lecture Content
The JTC cohort had a strong preference for hands on exercises based on the sessions that I observed. So, I devoted the majority of my session content to practical exercises that the attendees could execute on their laptops and on AWS.
I am a big fan of the EKS Workshop site's content management. So, I adopted Docusaurus to host my own workshop. I had two more important decisions to make:
- Where would I host the lab content?
- How would I build and refresh the lab content?
For #1, I am happy with the combination of CloudFront and S3 for my blog. I selected that combo for this workshop as well. For #2, I decided to try out GitHub Actions to see how it compares with CodePipeline.
Solution Overview
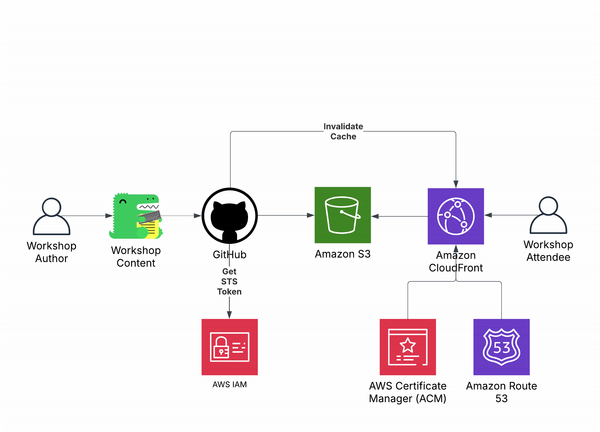
Here is what the final architecture looked like:

The progression, from writing the lab content to publishing it, proceeds as follows:
- I develop the workshop content locally using Docusaurus and make my commit to GitHub.
- My GitHub workflow checks out the repo on the Ubuntu Runner that it provisions.
- The Runner retrieves an Amazon STS token for the AWS IAM role that my repo is allowed to assume.
- The Runner installs Docusaurus and its dependencies and builds the site content.
- The site content is sync'ed with my S3 bucket.
- My CloudFront distribution's cache is invalidated so users immediately see the newest content the next time they access the site.
Now, let's get into the details...
Prerequisites
First, I needed to figure out how the GitHub Runners would access my AWS services. This goes without saying, but it bears repeating:
Friends don't let friends use static credentials (even if stored as GitHub Secrets). Seriously, folks, don't do it! 🧐
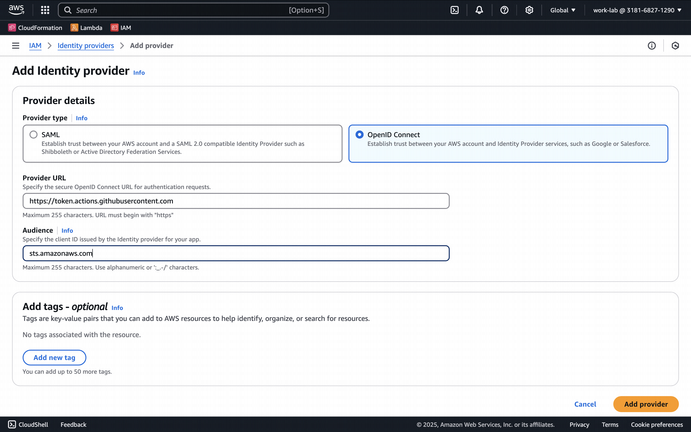
I researched how to configure GitHub as an Open ID Connect (OIDC) Identity Provider in AWS IAM. Thanks to GitHub's great documentation, it was a trivial configuration.

Next, I needed to automate the creation of the AWS resources to build and host the workshop content:
- An Amazon S3 Bucket
- An Amaazon CloudFront Distribution
- An AWS IAM Role for the GitHub Runner
- An Amazon Route 53 record for the distribution
- An AWS Certificate Manager certificate for HTTPS
If you've read any of my previous blog posts, you know my extreme aversion to PacOps (i.e. Point-and-click Ops). I opted for Pulumi to generate the resources. You can see my Pulumi code on GitHub. I'll explore this code in detail in my next blog post.
For this blog post, I'll focus on the GitHub Workflow YAML manifest:
Run, GitHub, Run!
First, I specify when the workflow executes. During development, I used the manual trigger to execute the workflow on demand (see the commented section). When I completed my testing, I configured the workflow to execute on pushes to the main branch but only when changes occur to my workshop content.
name: Deploy JTC Workshop to S3 and Invalidate the CloudFront Cache

on:
  push:
    branches:
      - main
    paths:
      - 'jtc-workshop/**' # Only trigger when workshop content changes

# # Debug
# on:
#   workflow_dispatch:
The GitHub workflow needs permissions to create the JSON Web Token (JWT) with GitHub's OIDC provider and to retrieve my content. The following two lines do just that with the specified id-token and contents values.
permissions:
  id-token: write  # Required for OIDC authentication
  contents: read   # Read repository contents
You can read more about GitHub OIDC permissions in the GitHub Docs.
I then create GitHub workflow environment variables to simplify future changes to the workflow. My IAM role, and s3 bucket name, and CloudFront distribution id are items I do not want to share with the world. So, I stored them in GitHub Secrets and referenced them in my environments section. In
env:
  AWS_ROLE_ARN: ${{ secrets.AWS_ROLE_ARN }}
  AWS_REGION: "us-east-1"
  S3_BUCKET_NAME: ${{ secrets.S3_BUCKET_NAME }}
  CLOUDFRONT_DISTRIBUTION_ID: ${{ secrets.CLOUDFRONT_DISTRIBUTION_ID }}
When you use secrets, those values are obfuscated as *** in the workflow logs:
Run aws-actions/configure-aws-credentials@v4
  with:
    role-to-assume: ***
    role-session-name: samplerolesession
    aws-region: us-east-1
    audience: sts.amazonaws.com
  env:
    AWS_ROLE_ARN: ***
    AWS_REGION: us-east-1
    S3_BUCKET_NAME: ***
    CLOUDFRONT_DISTRIBUTION_ID: ***
Assuming role with OIDC
Authenticated as assumedRoleId AROAUUFCORG5N5OZ7UFFQ:samplerolesession
In the lines that follow, I specify which GitHub-hosted Runner to use, and the steps it should follow to generate my artifacts: retrieve the repo, obtain an AWS STS token, install Node, install Docusaurus, and generate my workshop content.
jobs:
  deploy:
    runs-on: ubuntu-latest

    steps:
      - name: Checkout repository
        uses: actions/checkout@v4

      - name: Configure AWS credentials using OIDC
        uses: aws-actions/configure-aws-credentials@v4
        with:
          role-to-assume: ${{ env.AWS_ROLE_ARN }}
          role-session-name: samplerolesession
          aws-region: ${{ env.AWS_REGION }}
          audience: sts.amazonaws.com

      - name: Install Node.js and dependencies
        uses: actions/setup-node@v4
        with:
          node-version: '18'
          cache: 'npm'
          cache-dependency-path: jtc-workshop/package-lock.json

      - name: Install dependencies
        run: npm ci
        working-directory: jtc-workshop

      - name: Build Docusaurus site
        run: npm run build
        working-directory: jtc-workshop
Finally, the workflow syncs the generated files in the build Docusaurus subdirectory with my bucket. The --delete flag is used to get rid of any files in the bucket that don't exist in my generated files (ex: if I delete a workshop page.)
      - name: Sync build artifacts to S3
        run: aws s3 sync jtc-workshop/build s3://${{ env.S3_BUCKET_NAME }}/ --delete

      - name: Invalidate CloudFront cache (optional)
        if: env.CLOUDFRONT_DISTRIBUTION_ID != ''
        run: |
          aws cloudfront create-invalidation --distribution-id ${{ env.CLOUDFRONT_DISTRIBUTION_ID }} --paths "/*"
        continue-on-error: true
The Verdict
It was easy to get up and running with GitHub Actions. I have not kicked the tires on all its features, but I like what I see so far. The experience is a little different than with my blog infrastructure where CodeBuild retrieves my repo, builds my site content, and produces an artifact for the next step of my pipeline to use. The overall orchestration is managed by CodePipeline including maintaining a GitHub webhook, triggering CodeBiuld, sync'ing my content with S3, and triggering a Lambda to invalidate my CloudFront cache.
I suppose I can mimic the behavior of GitHub Actions by building all the logic into my CodeBuild instructions, but I do like the visualization that CodePipeline offers for the distinct build, test, and deploy steps of my workflow. I am sure I can replicate this behavior with GitHub Actions as well. I'll just continue diving deeper to see what all is possible with the service.
Which path you take depends on what decisions your organization has made with regards to your DevOps stack. If you want to run your stack as AWS-native as possible, check out CodePipeline and the other CI/CD tooling that AWS offers. However, if your org is a GitHub shop, checking out GitHub Actions would be worth your time.
Wrapping Things Up...
In this blog post, we discussed how to use GitHub Actions to access AWS APIs with dynamic credentials to automate the build and deployment of my Justice Through Code (JTC) workshop. JTC is a great program where you can lend your expertise to empower justice-impacted individuals along their IT career journeys. I highly recommend you consider volunteering based on your availability.
Let me know what you think about this post, or any other of my blog posts on BlueSky or on LinkedIn!